
Introduction
Building a full-stack, AI-powered application once implied a real budget: paid cloud credits, commercial API keys, and a team of engineers. That assumption no longer holds. By 2026, a developer can build, deploy, and run a production-ready application using only free LLMs and free, open tooling for everything else.
The landscape has shifted on several fronts. Open-weight models now rival their commercial counterparts on many tasks. Free AI coding assistants have grown from simple autocomplete into agents that can scaffold entire features. And capable models can be run at no cost, either locally or through provider free tiers.
This tutorial walks through a real-world example: an AI meeting-notes summarizer. A user uploads a voice recording; the application transcribes it, extracts key points and action items, and presents the result on a clean dashboard. The same patterns transfer to many other projects.
Why free large language models are viable now
Two years ago, an AI-powered app typically meant budgeting for paid API credits or renting expensive GPU instances. The economics have changed.
The gap between commercial and open-weight LLMs has narrowed considerably. Models such as GLM-4.7-Flash from Zhipu AI show that openly released systems can deliver strong performance while remaining free to download and run; GLM-4.7-Flash is a 30-billion-parameter mixture-of-experts model that activates only about 3 billion parameters per token, which keeps it practical on consumer hardware. Compact models such as LFM2-2.6B from Liquid AI are designed for on-device deployment and run on modest hardware.
The practical consequence is reduced vendor lock-in. If one model does not suit a use case, another can usually be substituted without re-architecting the surrounding infrastructure.
The shift toward local models
There is growing interest in running AI models on local hardware rather than sending data to the cloud. The motivations extend beyond cost to privacy, latency, and control. Tools such as Ollama and LM Studio make it straightforward to run capable models on a laptop. A related walkthrough covers running small AI models locally in more detail.
The “bring your own key” model
A newer category of tools is free to use but asks the user to supply an API key. This adds flexibility: the application can call a hosted service such as the Google Gemini API, which offers a free tier with daily request limits, or fall back to a fully local model with no running cost.
Choosing a free AI stack
Each component of the application has a credible free option. The tables below summarize common choices that balance performance against ease of setup.
Transcription: speech to text
| tool | Type | free tier | best for |
|---|---|---|---|
| OpenAI Whisper | Open-source model | Unlimited (self-hosted) | accuracy, multiple languages |
| whisper.cpp | Privacy-focused implementation | Unlimited (Open Source) | Privacy-Sensitive Scenarios |
| gemini api | cloud api | 60 requests/minute | rapid prototyping |
This project uses Whisper, OpenAI’s open-source speech-to-text model, which can run locally or through free hosted options. It supports a wide range of languages and produces high-quality transcripts. For an alternative approach, see this guide to running real-time speech models locally.
Summarization and analysis: the language model
This is where the options are widest. The choices below are all free to use:
| Sample | provider | Type | expertise |
|---|---|---|---|
| glm-4.7-flash | Zipu AI | Cloud (Free API) | general purpose, coding |
| lfm2-2.6b-transcript | liquid ai | local/on device | meeting Summary |
| gemini 1.5 flash | cloud api | Long story, open level | |
| gpt-oss swallow | Tokyo Tech | local/self-host | Japanese/English logic |
For meeting summarization, a compact local model such as LFM2-2.6B is a reasonable fit: it is small enough to run on modest hardware while still handling short-form summarization. A hosted model can be substituted when more capacity is needed.
Faster development: AI coding assistants
Before writing code, it is worth choosing an assistant that speeds up work inside the editor:
| tool | free tier | Type | key feature |
|---|---|---|---|
| humor | completely free | vs code extension | niche-driven, multi-agent |
| codiaum | unlimited free | IDE extension | 70+ languages, fast estimation |
| cline | Free (BYOK) | vs code extension | autonomous file editing |
| continue | full open source | IDE extension | Works with any LLM |
| bolt.di | self hosted | browser ide | full-stack generation |
For this walkthrough, a free-tier assistant such as Codeium is sufficient; any comparable tool serves the same purpose.
How the application fits together
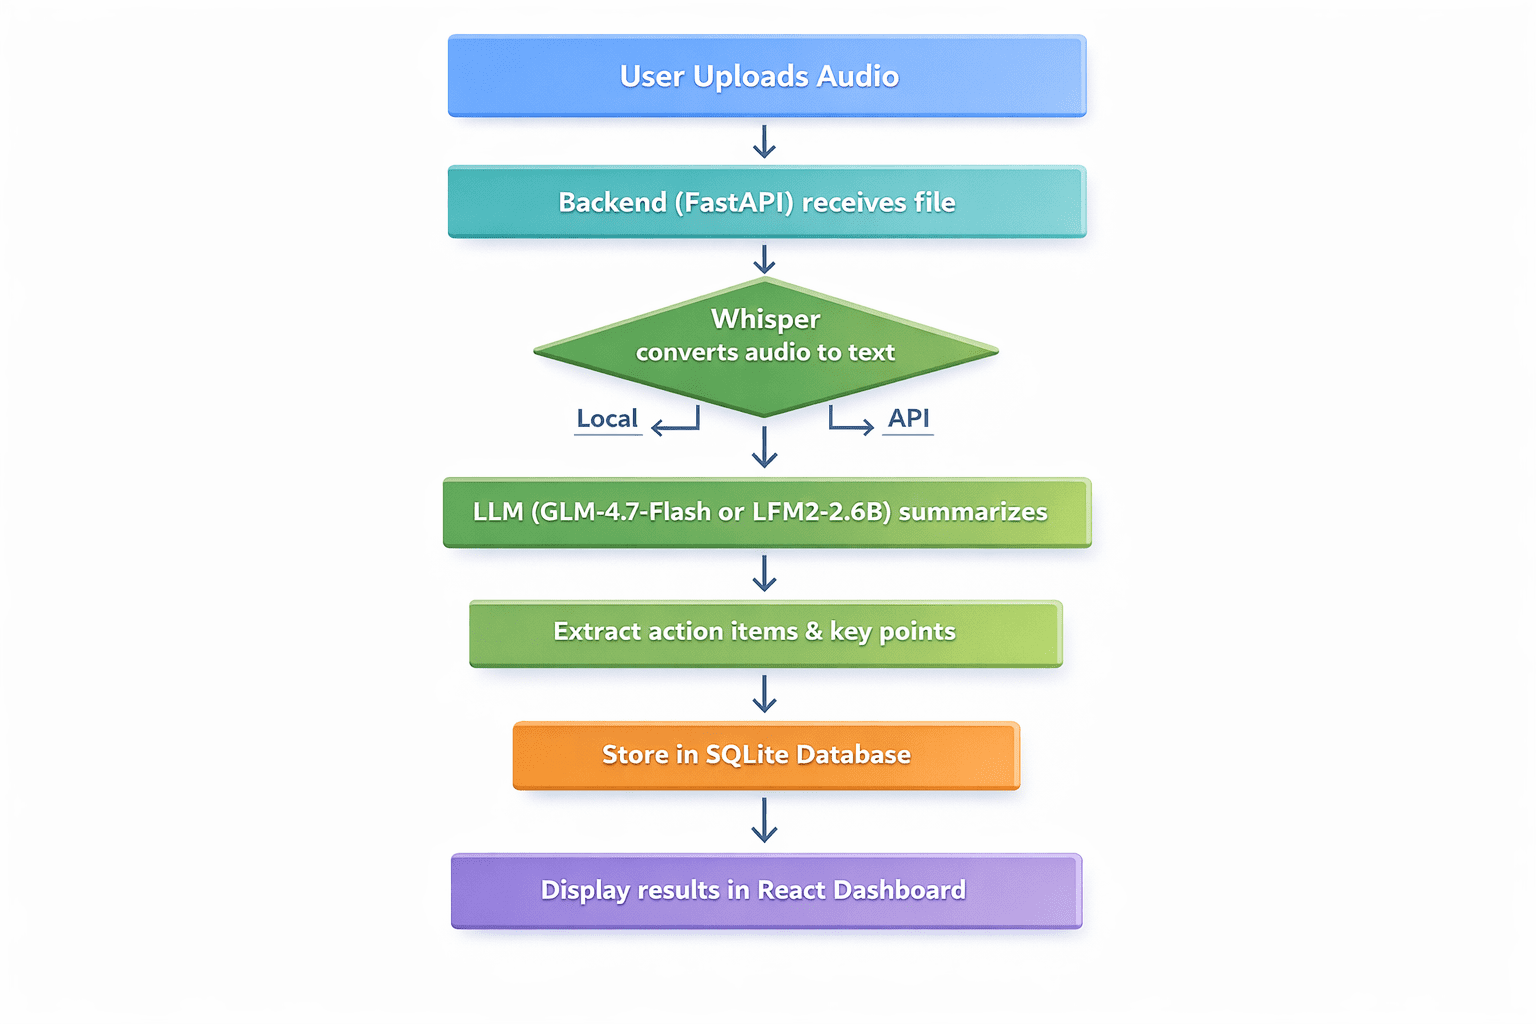
The flow is straightforward: a user uploads an audio file, the backend transcribes it with Whisper, an LLM summarizes the transcript into key points, action items, and decisions, the results are stored in SQLite, and a dashboard displays the transcript, summary, and action items.
Prerequisites
- Python 3.9 or newer
- Node.js and npm
- Basic familiarity with Python and React
- A code editor (VS Code works well)
Step 1: Set up the backend with FastAPI
Create the project directory and a virtual environment:
mkdir meeting-summarizer
cd meeting-summarizer
python -m venv venv
Activate the virtual environment:
# On Windows
venvScriptsactivate

# On Linux/macOS
source venv/bin/activate
Install the required packages:
pip install fastapi uvicorn python-multipart openai-whisper transformers torch openaiCreate a main.py file for the FastAPI application and add the following:
from fastapi import FastAPI, File, UploadFile, HTTPException
from fastapi.middleware.cors import CORSMiddleware
import whisper
import sqlite3
import json
import os
from datetime import datetime

app = FastAPI()

# Enable CORS for React frontend
app.add_middleware(
    CORSMiddleware,
    allow_origins=("http://localhost:3000"),
    allow_methods=("*"),
    allow_headers=("*"),
)

# Initialize Whisper model - using "tiny" for faster CPU processing
print("Loading Whisper model (tiny)...")
model = whisper.load_model("tiny")
print("Whisper model loaded!")

# Database setup
def init_db():
    conn = sqlite3.connect('meetings.db')
    c = conn.cursor()
    c.execute('''CREATE TABLE IF NOT EXISTS meetings
                 (id INTEGER PRIMARY KEY AUTOINCREMENT,
                  filename TEXT,
                  transcript TEXT,
                  summary TEXT,
                  action_items TEXT,
                  created_at TIMESTAMP)''')
    conn.commit()
    conn.close()

init_db()

async def summarize_with_llm(transcript: str) -> dict:
    """Placeholder for LLM summarization logic"""
    # This will be implemented in Step 2
    return {"summary": "Summary pending...", "action_items": ()}

@app.post("/upload")
async def upload_audio(file: UploadFile = File(...)):
    file_path = f"temp_{file.filename}"
    with open(file_path, "wb") as buffer:
        content = await file.read()
        buffer.write(content)

    try:
        # Step 1: Transcribe with Whisper
        result = model.transcribe(file_path, fp16=False)
        transcript = result("text")

        # Step 2: Summarize (To be filled in Step 2)
        summary_result = await summarize_with_llm(transcript)

        # Step 3: Save to database
        conn = sqlite3.connect('meetings.db')
        c = conn.cursor()
        c.execute(
            "INSERT INTO meetings (filename, transcript, summary, action_items, created_at) VALUES (?, ?, ?, ?, ?)",
            (file.filename, transcript, summary_result("summary"),
             json.dumps(summary_result("action_items")), datetime.now())
        )
        conn.commit()
        meeting_id = c.lastrowid
        conn.close()

        os.remove(file_path)
        return {
            "id": meeting_id,
            "transcript": transcript,
            "summary": summary_result("summary"),
            "action_items": summary_result("action_items")
        }
    except Exception as e:
        if os.path.exists(file_path):
            os.remove(file_path)
        raise HTTPException(status_code=500, detail=str(e))
Step 2: Integrate an open language model
Next, implement the summarize_with_llm() function. Two approaches are shown.
Option A — a hosted free API (GLM-4.7-Flash):
from openai import OpenAI

async def summarize_with_llm(transcript: str) -> dict:
    client = OpenAI(api_key="YOUR_FREE_ZHIPU_KEY", base_url="https://open.bigmodel.cn/api/paas/v4/")

    response = client.chat.completions.create(
        model="glm-4-flash",
        messages=(
            {"role": "system", "content": "Summarize the following meeting transcript and extract action items in JSON format."},
            {"role": "user", "content": transcript}
        ),
        response_format={"type": "json_object"}
    )

    return json.loads(response.choices(0).message.content)
Option B — a fully local model with no running cost:
from transformers import AutoModelForCausalLM, AutoTokenizer
import torch

async def summarize_with_llm_local(transcript):
    model_name = "LiquidAI/LFM2-2.6B-Transcript"
    tokenizer = AutoTokenizer.from_pretrained(model_name)
    model = AutoModelForCausalLM.from_pretrained(
        model_name,
        torch_dtype=torch.float16,
        device_map="auto"
    )

    prompt = f"Analyze this transcript and provide a summary and action items:nn{transcript}"
    inputs = tokenizer(prompt, return_tensors="pt").to(model.device)

    with torch.no_grad():
        outputs = model.generate(**inputs, max_new_tokens=500)

    return tokenizer.decode(outputs(0), skip_special_tokens=True)
Step 3: Build the React frontend
Create a small React frontend to call the API. In a new terminal, create a React app:
npx create-react-app frontend
cd frontend
npm install axios
Replace the contents of src/App.js with:
import React, { useState } from 'react';
import axios from 'axios';
import './App.css';
function App() {
const (file, setFile) = useState(null);
const (uploading, setUploading) = useState(false);
const (result, setResult) = useState(null);
const (error, setError) = useState('');
const handleUpload = async () => {
if (!file) { setError('Please select a file'); return; }
setUploading(true);
const formData = new FormData();
formData.append('file', file);
try {
const response = await axios.post('http://localhost:8000/upload', formData);
setResult(response.data);
} catch (err) {
setError('Upload failed: ' + (err.response?.data?.detail || err.message));
} finally { setUploading(false); }
};
return (
{result && (
Summary
{result.summary}
Action Items
{result.action_items.map((it, i) => - {it}
)}
)}
);
}
export default App;Step 4: Run the application
- Start the backend from the main directory with the virtual environment active:
uvicorn main:app --reload - Start the frontend in a new terminal, from the frontend directory:
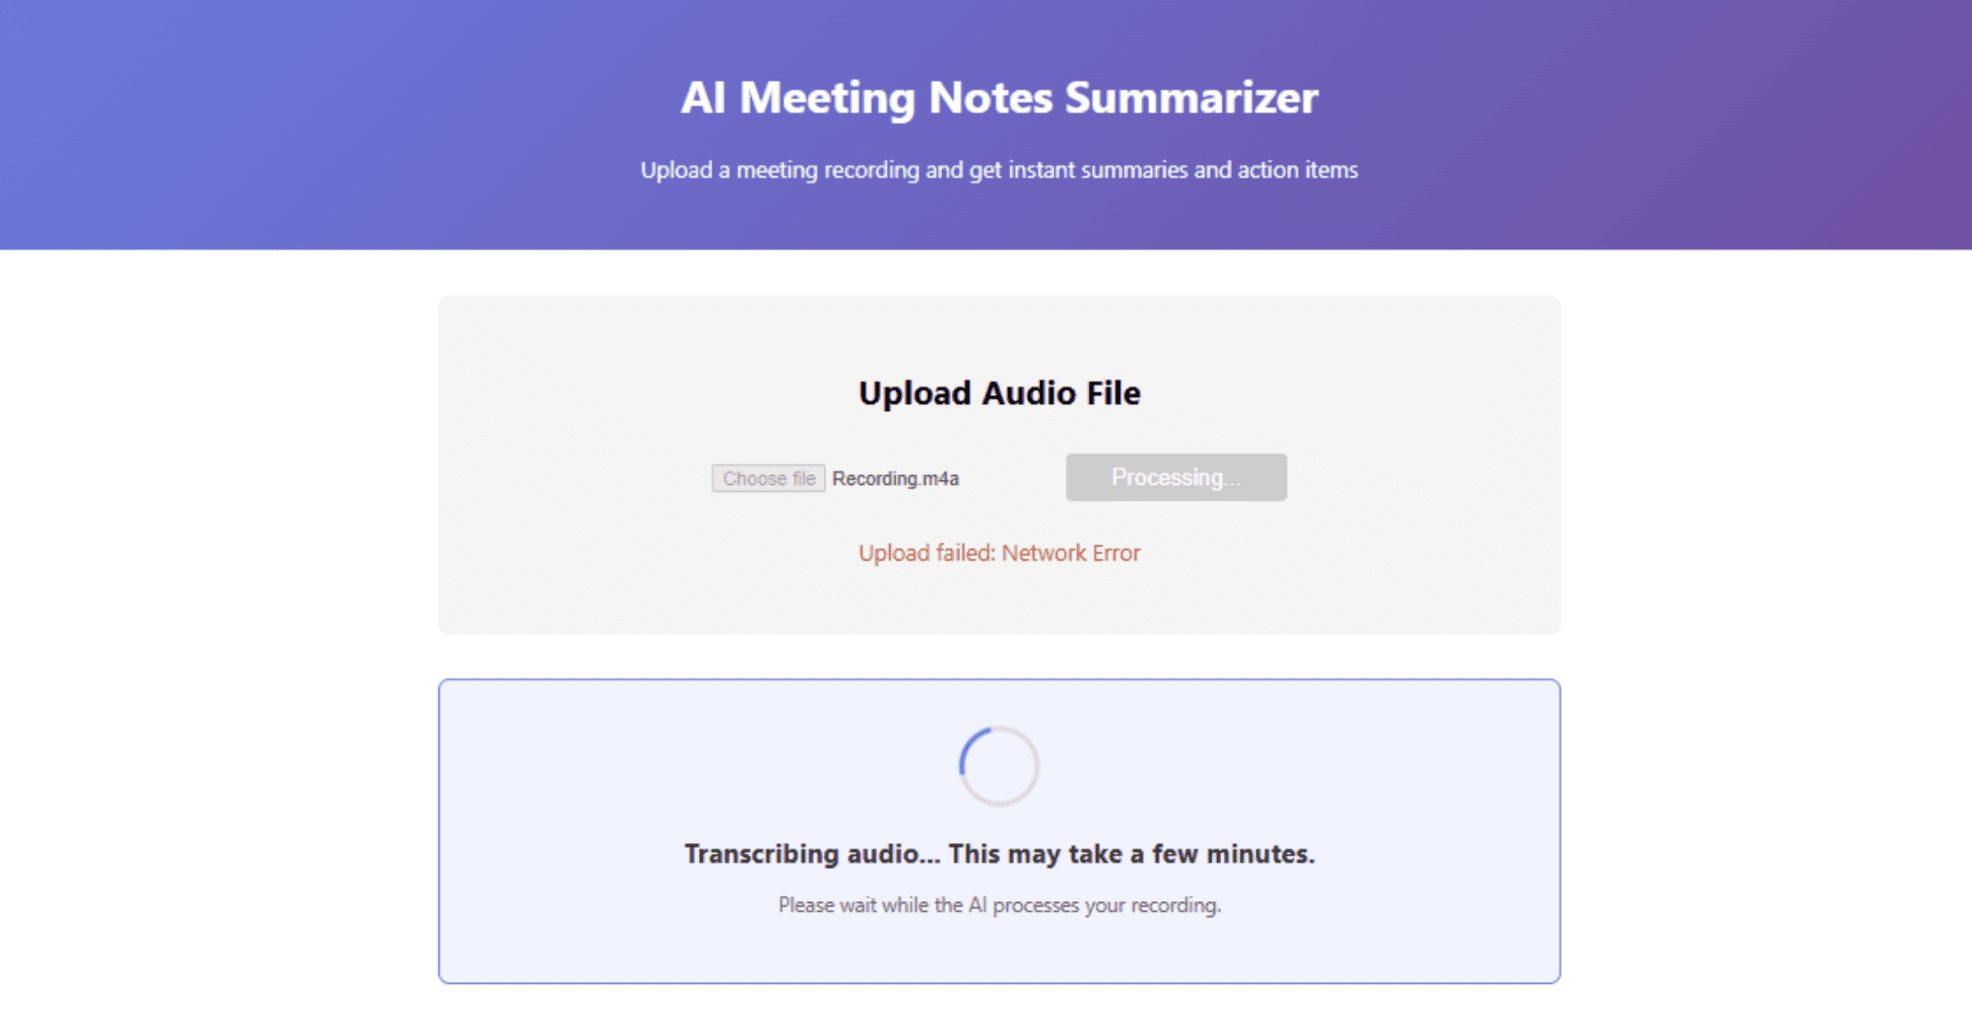
npm start - Open the local URL in a browser and upload a test audio file.
Deploying the app for free
Once the app works locally, it can be deployed publicly at no cost. Render offers a free tier for web services. After pushing the code to a GitHub repository, create a new web service on Render with these settings:
- Environment: Python 3
- Build command:
pip install -r requirements.txt - Start command:
uvicorn main:app --host 0.0.0.0 --port $PORT
Create a requirements.txt file:
fastapi
uvicorn
python-multipart
openai-whisper
transformers
torch
openai
Note: Whisper and the Transformers libraries require significant disk space. If a free tier’s limit is reached, using a hosted API for transcription is a practical alternative.
Deploying the frontend on Vercel
Vercel is one of the simplest ways to deploy a React app:
- Install the Vercel CLI:
npm i -g vercel - From the frontend directory, run
vercel - Update the API URL in
App.jsto point to the Render backend.
Running entirely locally
To avoid cloud hosting altogether, both the frontend and backend can run on a local machine, with a tool such as ngrok used to expose the local server temporarily.
Limitations and what to watch
A free stack involves trade-offs. Free tiers carry rate limits and usage caps that can interrupt a production workload, and providers change those terms over time, so current limits should be confirmed before relying on them. Running models locally shifts the cost from API fees to hardware: Whisper transcription and local LLM inference both consume memory and disk, and a small model’s output will not match that of a large hosted one. Audio quality, accents, and background noise affect transcription accuracy, so any generated summary should be reviewed before it is treated as an authoritative record. For workloads handling sensitive recordings, local processing reduces data-sharing concerns but does not remove the need for basic security and access controls.
Conclusion
A production-ready AI application can be assembled entirely from free components: Whisper for transcription, an open model such as GLM-4.7-Flash or a local model like LFM2-2.6B for summarization, FastAPI for the backend, React for the frontend, SQLite for storage, and free tiers on Render and Vercel for deployment. The barrier to building with AI is now far lower than it was, and the main investment is time rather than money.